If you have been playing with your camera controls and stumbled upon the setting called Bracketing and wondering what does it mean here is a brief explanation. Bracketing is a technique where you take multiple photos of the same subject at different levels of exposure. Typically most cameras would take three photos. One with correct exposure, one under exposed and one over exposed. Some point and shoots cameras and even cellphones have this feature. They may take only two images, one over exposed and a correct exposure. On the other hand high end cameras can take 5 or more exposures.
Why do Bracketing?
Digital cameras have a limitation of the dynamic range of light they can capture. A camera at present cannot capture the dynamic range of light we can see. Now if you want to go beyond this limitation of your camera and get close to what you see then can use bracketing and extend the dynamic range there by getting a High Dynamic Range or HDR.
Using Bracketing.
I'll explain using the series of images below. I used three exposures for this example, one correct, one over and one under exposed.
The first image is a correct exposure. If see the image you find the top half is correctly exposed. The blue band is slightly over exposed and the bottom half is under exposed and can hardly make out any detail. In the second image the top half and the bottom half are under exposed but the blue band is correctly exposed. Finally when you get to the third photo below most of the image is over exposed. In fact you can't even read the text in the blue band. However, you can see a lot of detail in the bottom half of the image.
 |
| Image 1 Correct Exposure |
 |
| Image 2 Correct Exposure |
 |
| Image 3 Correct Exposure |
I took these three photos into Gimp and put them on three different layers. Using layer mask I retained the blue band from the second image the top half from the first image and the bottom half from the third image. HDR V1 is what my first attempt looked like. The image looks a bit unnatural so reduced the opacity on the bottom image and made HDR V2. Something that looks more believable ... at least to my eyes.
 |
| Image 4 HDR V1 |
 |
| Image 5 HDR V2 |
Some cameras allow you to shoot HDR. In that case the camera is doing the same thing as I did above in software. The camera takes successive photos and merges them to form a single image with a high dynamic range. You may also make HDR images from a single RAW file using software's like Lightroom, Photoshop, Gimp or Photomatix (Photomatix is one of best known software for HDR imagery)
One thing you keep in mind when you shoot bracketed images is, camera shake. The three images have to align to form a single image. If you hand shakes during these three exposures then what you will get is Ghosting (the images not aligning because the composition changed ever so slightly. Some software can correct for this). It is preferred that you shoot with a tripod especially if the shutter speed is really slow. You can shoot hand held as well but it depends on the situation. If you over exposed image is going to have a shutter speed below 1/50 then its better to shoot with a tripod. (for the example I shot hand held)
Here are a couple of more examples of HDR
The Image below is a HDR by editing a single Raw file
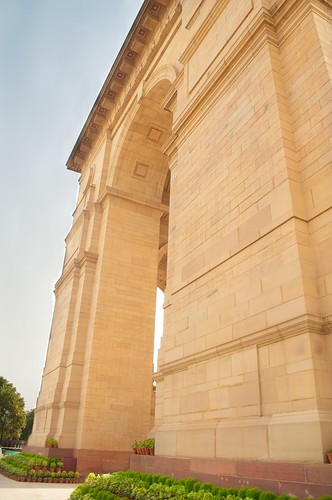
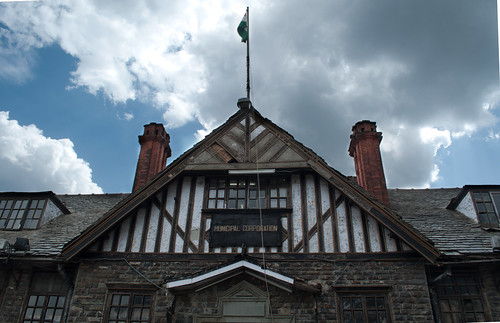
This image was created using three images
If search on flickr for HDR you will get some images which look normal while others look surreal (well beyond the first Image I made [HDR V1]). The debate continues as to how to use HDR, wheather to use it to extend the dynamic range or to use it as an effect. At the end of the day it depends on the photographers vision. It's what you like. If you would like to know more you can check out the resources below.